Google Cloud and Device Access Project Setup and Configuration
In order to use the the NestSDM plugin with a personal Device Access project in your Google Developer's
sandbox, you must first create a Google Cloud project with the SDM and Pub/Sub APIs enabled, create and
configure an OAuth Client for the Google Cloud project, and then create a Google Device Access project and
configure it with the OAuth Client and enable events processing. Step-by-step instructions follow, but please
review the following notes before getting started:
- These instructions are based on the current state of the Google Cloud and Device Access consoles as
of the time of this writing. Google may change the console layout and configuration steps at any time,
so please refer to the Google documentation for the most current information. These steps are adpated
for the NestSDM Plugin from the Google Device Access Getting Started Guide which can be found here:
Get Started | Device
Access | Google for Developers
- You should have already activated your Nest devices in the Google Home app using your Google account.
Note that legacy Nest accounts are not supported. You should be using the same Google Account ID
(email address) for accesing the Google Cloud and Google Device Acccess consoles and creating the
relative projects as you used in activating your Nest devices in the Google Home app.
- The Google Cloud Platform (GCP) and the Google Device Access Console currently appear to be somewhat
separate and isolated platforms, so the configuration will at times appear to be disjointed. It is also
important to do these steps in order for everything to work correctly.
- I suggest having Notepad (or Mac equivalent) open during the configuration so that you can copy and
paste the project ID, GCP project ID, OAuth Client ID, and OAuth Client Secret from the various console
pages as you go for setting the required Custom Configuration Parameters in the NestSDM plugin once
everything is setup.
- If you have already been using Home Assistant (HA) with your Google Nest devices, you may already have
the required Google Cloud and Google Device Access projects setup and configured, and these steps are not
necessary.
Step 1 - Register for Device Access (Device Access Console)
Before creating your projects, you must register for Device Access. Registration includes payment of a one-time
fee (US$5) per account. Registration is done in the Google Device Access Console. You can access the Device
Access Console here: Device Access
Console. You will be asked to agree to the terms of service and such and then register and pay the fee if
this is your first time in the Device Access Console.
Step 2 - Use the Wizard to Set up Google Cloud Platform
Next, you need to setup the GCP Project to support Device Access, enable the SDM API, and create an OAuth client
for the project(s). This is all done through a script on the Getting Started Guide webpage that runs a wizard
that walks you through the details. Here is a step-by-step guide for using the wizard (you will want to
keep this page open in a separate window/tab for reference):
-
Go to the Google
Device Access Getting Started Guide webpage.
-
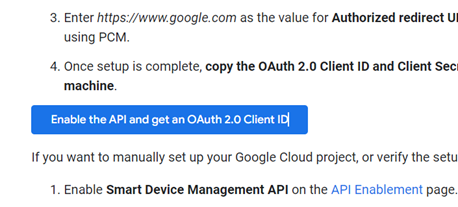
Scroll down to the button labeled "Enable the API and get an OAuth 2.0 Client ID" and click it:
-
In the first wizard screen, choose "+ Create a new project" in the "Select or create project" drop-down:

-
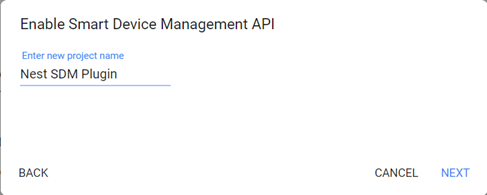
Enter "Nest SDM Plugin" as the new project name and click "NEXT":
-
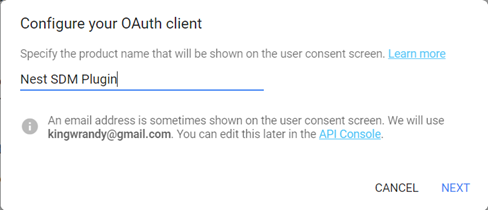
Enter "Nest SDM Plugin" as the product name for the OAuth client and click "NEXT":
-
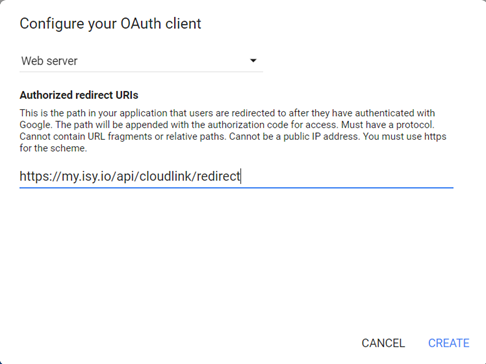
Select "Web server" from the "Where are you calling from?" drop-down and enter
"https://my.isy.io/api/cloudlink/redirect" as the redirect URI, then click "CREATE":
A confirmation dialog will be displayed with the OAuth Client ID and Client secret for the newly created OAuth
client. You can copy those from this dialog, but if you miss it, there is another opportunity to retrieve
those values in Step 5 below.
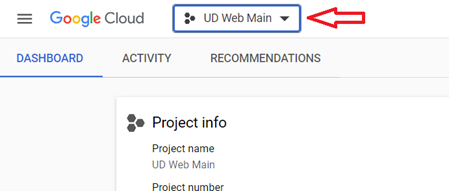
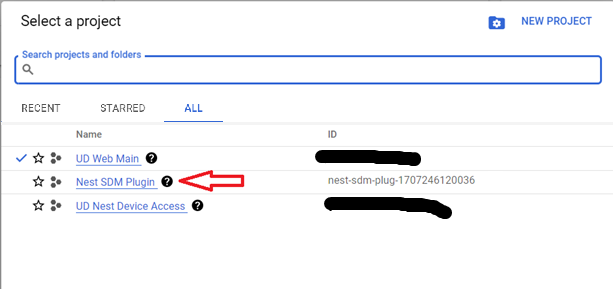
Step 3 - Access Google Cloud Project in the Dashboard (Google Cloud Console)
Next, access the GCP Project you just created in the Google Cloud Dashboard here: Google Cloud Console - Dashboard. If
this is your first time in the Google Cloud Console, then the "Nest SDM Plugin" project you created may already
be selected. If not, click the Project Selection dropdown in the top left corner of the Dashboard to open the
"Select a project" dialog. In the dialog, select "All" to view all projects in your account, and then select
the newly created "Nest SDM Plugin" project from the project selection window:
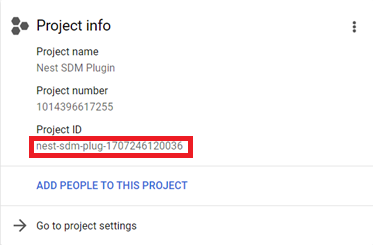
Once the "Nest SDM Plugin" project is selected, copy the "Project ID" value in the "Project info" tile at the top
left Dashboard display. This is the "GCP Project ID" you will need for the NestSDM plugin configuration.
Step 4 - Enable Pub/Sub for the GCP Project (Google Cloud Console)
The Nest SDM Plugin uses Push Events from Device Access to update state of devices in IoX. Push Events are enabled
by the Google Cloud Pub/Sub API. However, the Pub/Sub API is not enabled for the GCP Project by default, so this
must be done manually:
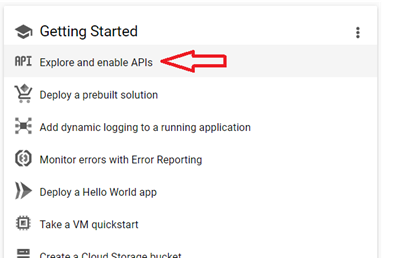
-
In the "Getting Started" tile of the Dashboard (2 or 3 down on the left), click the "Explore and enable APIs"
menu item:
-
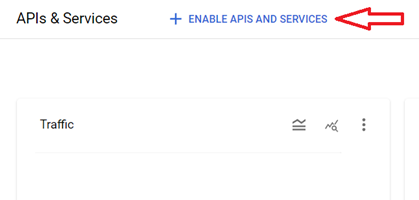
At the top of the "APIs & Services" page, click "+ ENABLE APIS AND SERVICES":
-
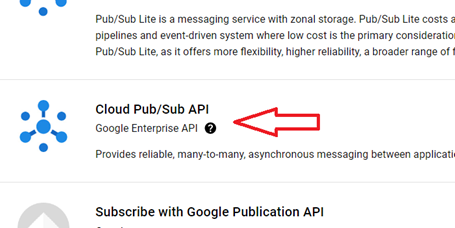
Next, on the "API Library" page, enter "Pub/Sub" in the search bar and then select the "Cloud Pub/Sub API"
item in the search results:
-
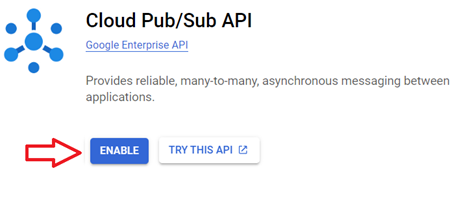
On the "Cloud Pub/Sub API" page, click the "ENABLE" button to enable the API for the GCP project:
Step 5 - Retrieve OAuth Client settings for GCP Project (Google Cloud Console)
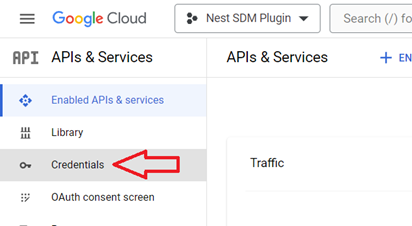
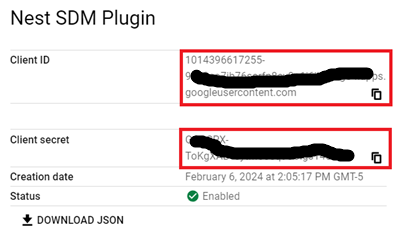
Returning to the "API & Services" page, select "Credentials" from the left column menu:
On the "Credentials" page, you should see an OAuth Client named "Nest SDM Plugin" or "OAuth Client" listed under
the "OAuth 2.0 Client IDs" list. Click the "Download OAuth client" (download icon) out to the right of this list
item to display the details for the OAuth client. Copy the "Client ID" and "Client secret" values from the display.
You will need these for the NestSDM plugin configuration.
Step 6 - Set the Publishing Status of GCP Project to "In Production" (Google Cloud Console)
The GCP project may initially be created with a publishing status of "Testing." In this status, your OAuth
Authorization to the Device Access project will expire after 7 days and you will have to re-authorize. In
order to prevent this, the status of the GCP project must be set to "In Production." Returning to the "API
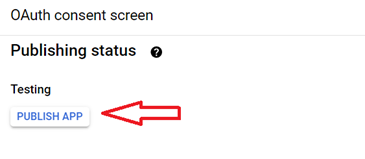
& Services" page, select "OAuth consent screen" from the left column menu:

On the "Oauth consent screen" page, if the "Publishing status" section shows a status of "Testing," click the
"PUBLISH APP" button to change the publishing status:
You will receive a confirmation dialog warning you that your project will be accessible to all users. While a user
could conceivably authenticate to your project if they were given the authorization URL, this would simply expose
their Google Nest Devices to your plugin, and wouldn't expose any information pertaining to your Google ID
externally. Click the "CONFIRM" button on the confirmation dialog.
Step 7 - Create a Device Access Project (Device Access Console)
Finally (really?!?) you create a Device Access project. This is done in a wizard in the Google Device Access console. You will need to the
Client ID of the OAuth client created above in Step 5 for this step:
-
Access the Device Access Console here: Device Access Console. Click on the "Create project"
tile.
-
Enter a project name of "Nest SDM Plugin" and click the "Next" button.
-
Enter the OAuth client ID copied from the Google Cloud Console in Step 5 above and click the "Next"
button.
-
Select "Enable" for the Events and click the "Create project" button.
Once the Device Access Project is created, you will see a display the details for the project. Copy the
"Project ID" value for the project for the NestSDM plugin configuration. You may also want to verify that the
proper OAuth client ID was supplied and that the Pub/Sub topic (for Events) shows as "Enabled."

Creation and configuration of the Device Access and GCP projects should now be complete. You can proceed to
install the NestSDM plugin in PG3 and configure the Custom Configuration Parameters using the Project ID, GCP
Project ID, OAuth Client ID, and OAuth Client Secret values you copied during the process.